Reconstruction of a Bantam headlight
nacelle by a beginner.
Last modified 5 April 2001
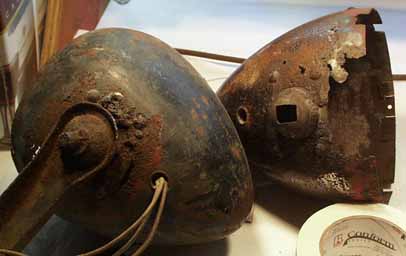 One of the most sought after parts
for a Bantam is the headlight assembly, especially the nacelles
which are perfectly proportioned for the little cars, and also
a classic and very beautiful "teardrop" shape (especially
with the lens in place) so typical of first rate late thirties
automotive design.
One of the most sought after parts
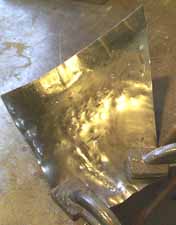
for a Bantam is the headlight assembly, especially the nacelles
which are perfectly proportioned for the little cars, and also
a classic and very beautiful "teardrop" shape (especially
with the lens in place) so typical of first rate late thirties
automotive design.
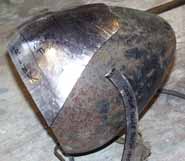
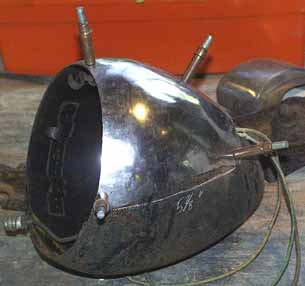
If you are lucky enough to find any of these nacelles at all
they typically suffer from two major problems. For cars left outside,
the bottom is invariably rotted out (as seen on both of these
example)..and/or the nacelle has been modified to fit a sealed
beam unit (often a legal requirement) such as seen on the example
at right, thus losing the fine turned down egg shape they had.
Someone has applied some crude welding to the lefthand unit, so
I can't even get the brace off. What to do? 80% of the units shown
are in pretty good shape: so, throwing them away would be a shame.
I decided to try to use some of my largely theoretical metalshapers
skills to effect a repair...let's see how I do! Hey..If I can
do it..you can do it!
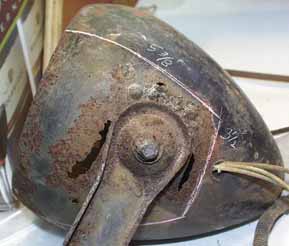 1.
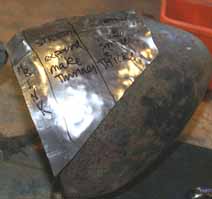
First I mark out and measure the rotted area to be removed. Since
the area around the little wiring fitting looks okay, I would
like to leave that. Hey, this is just like brain surgery eh!?
1.
First I mark out and measure the rotted area to be removed. Since
the area around the little wiring fitting looks okay, I would
like to leave that. Hey, this is just like brain surgery eh!?
 2.
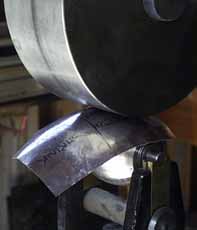
I have meausred the original sheetmetal thickness to find it is
18 gauge. I make a pattern based on my measurements which we will
see later was too small! Well almost too small. Leave yourself
some extra sheetmetal on all the sides! it's very inexpensive
and far better than finding your much labored over patch isn't
big enough! Ruins the whole day!
2.
I have meausred the original sheetmetal thickness to find it is
18 gauge. I make a pattern based on my measurements which we will
see later was too small! Well almost too small. Leave yourself
some extra sheetmetal on all the sides! it's very inexpensive
and far better than finding your much labored over patch isn't
big enough! Ruins the whole day!
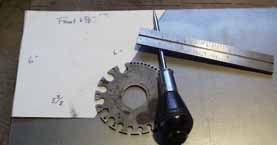
 3. I know I am going to need a
contour gauge to use in constantly checking my work, so I make
one using a shrinker and stretcher of the "Lancaster "type.
Contour gauges are very useful for many things (like in making
the wooden rail behind the seats on a Bantam Roadster!) and these
ingenious devices cost only about 100-125 each...here I have them
mounted on a rolling hydraulic table I got at Harbor freight.
Very handy. Anyway, you just put the metal in the teeth and pump,
and it stretches or shrinks the metal. It has teeth that "grab"
the metal and either gather it (shrink) or stretch it (stretch).Very
neat.
3. I know I am going to need a
contour gauge to use in constantly checking my work, so I make
one using a shrinker and stretcher of the "Lancaster "type.
Contour gauges are very useful for many things (like in making
the wooden rail behind the seats on a Bantam Roadster!) and these
ingenious devices cost only about 100-125 each...here I have them
mounted on a rolling hydraulic table I got at Harbor freight.
Very handy. Anyway, you just put the metal in the teeth and pump,
and it stretches or shrinks the metal. It has teeth that "grab"
the metal and either gather it (shrink) or stretch it (stretch).Very
neat.
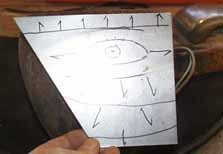 4.
A "compound curve" is one that bends in two directions
at once. It will look like a parachute you made as a kid with
a rope tied to each of four corners. A simple curve bends one
way, like a pipe. Here I try to anticipate what needs to happen
to this flat piece of metal to make the shape of the headlight
(very inexpertly I have to say in hindsight ) . Everyone thinks
of metal as immobile and hard. Get over it. It is really more
like a stick of stale chewing gum. You can only do a few things
to metal..shrink it, stretch it, cut it, join it and something
else I can;t remember right now. Here I think I want to stretch
the area in the middle (looks like an eye) making a little mountain,
and shrink the area in front where the shape dives into the lens....like
the sides of a hill on a topographical map. Who knows?
4.
A "compound curve" is one that bends in two directions
at once. It will look like a parachute you made as a kid with
a rope tied to each of four corners. A simple curve bends one
way, like a pipe. Here I try to anticipate what needs to happen
to this flat piece of metal to make the shape of the headlight
(very inexpertly I have to say in hindsight ) . Everyone thinks
of metal as immobile and hard. Get over it. It is really more
like a stick of stale chewing gum. You can only do a few things
to metal..shrink it, stretch it, cut it, join it and something
else I can;t remember right now. Here I think I want to stretch
the area in the middle (looks like an eye) making a little mountain,
and shrink the area in front where the shape dives into the lens....like
the sides of a hill on a topographical map. Who knows?
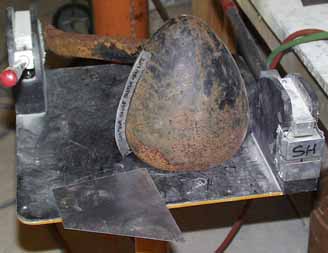
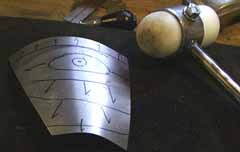 5
. First I make the "simple curve" ...the one like a
pipe...to conform to the round , cyylindrical form of the nacelle.
You can do this pretty much with your hands...and of course it
could go in either of the directions...
5
. First I make the "simple curve" ...the one like a
pipe...to conform to the round , cyylindrical form of the nacelle.
You can do this pretty much with your hands...and of course it
could go in either of the directions...
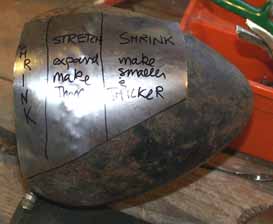 6. With a hammer (ho-made) and
shot bag (the black leather thing above filled with number 9 lead
shot ...(or sand will do) I stretch out the parts I think need
to be stretched by beating on them and bellying it out, and I
shrink (on those Lancaster things) what I think needs to be smaller.
Actually, here it looks like I'm almost finished. In fact this
has only taken me about 15 minutes to get this far (I know because
I've done it three or four times now!) but, I will spend hours
trying to get it right and haven't really done so yet..in other
words, this is where things start to get elusive.
6. With a hammer (ho-made) and
shot bag (the black leather thing above filled with number 9 lead
shot ...(or sand will do) I stretch out the parts I think need
to be stretched by beating on them and bellying it out, and I
shrink (on those Lancaster things) what I think needs to be smaller.
Actually, here it looks like I'm almost finished. In fact this
has only taken me about 15 minutes to get this far (I know because
I've done it three or four times now!) but, I will spend hours
trying to get it right and haven't really done so yet..in other
words, this is where things start to get elusive.
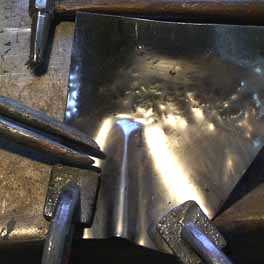 7. Shrinking is kind of hard to
explain. How the hell can metal shrink?! You can see the hammer
blows here where I stretched the metal..that's easy to understand.
To shrink..try to think of making the metal "fatter"
in places, thus requiring the ends to closer to each other. Here
is a "ruffle" which is just like a "dart"
in tailoring...when the tailor wants to take it in.
7. Shrinking is kind of hard to
explain. How the hell can metal shrink?! You can see the hammer
blows here where I stretched the metal..that's easy to understand.
To shrink..try to think of making the metal "fatter"
in places, thus requiring the ends to closer to each other. Here
is a "ruffle" which is just like a "dart"
in tailoring...when the tailor wants to take it in.
Here, another ho-made tool (left) makes the ruffle: It looks
like a heron's beak which "bites" the metal...(twist
twice..once in each direction or else you get a sine wave not
a ruffle) and I clamp both sides to the table so when I start
pounding on it it can't escape to the sides. Start at the top
of the ruffle and pound towards youreslf, being careful not to
crease the metal...just make it thicker (crowd those molecules
together)...maybe you will notice a slight bulge where the metal
has tried to "escape" out the front from between the
two clamps? That's okay...you want the end to end dimension to
be less..to shrink..you can always trim up the front later. How
do you know it os shrinking? Because it curls up like a green
leaf in a fire...(that's also shrinking right?)
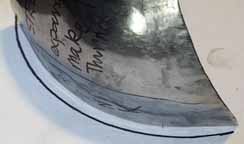
 8. See I told ya'...now the ruffle
is flattened and the distance from side to side is a little less
(though the metal may be a little thicker)
8. See I told ya'...now the ruffle
is flattened and the distance from side to side is a little less
(though the metal may be a little thicker)
 9. Doesn't look a whole lot better
than before does it?Well, it does fit a bit better, take my word
for it...
9. Doesn't look a whole lot better
than before does it?Well, it does fit a bit better, take my word
for it...
 10. Here I have begun to "wheel"
the shape in the English Wheel ..notice that the "sack of
walnuts" look is disappearing and the piece has a nice buttery
sheen to it...Notice too the countour gauge there...my constant
companion now...
10. Here I have begun to "wheel"
the shape in the English Wheel ..notice that the "sack of
walnuts" look is disappearing and the piece has a nice buttery
sheen to it...Notice too the countour gauge there...my constant
companion now...
 11. One major piece of equipment
that will be needed if you get to doing a lot of sheet metal work
is an "English Wheel". There are a lot of kits for them
if you have welding skills..or, maybe you can find a good used
one around. A wheel can be thought of as a long skinny hammer.
It is a stretching device wherein the metal is squeezed between
the top wheel and different shaped interchangeable anvils below.
It is a lot quieter than a hammer, and it stretches with smooth
strokes rather than "walnut" hammer dings. Note how
the hammer dings are gone and the metal is taking on an even sheen
and shape.
11. One major piece of equipment
that will be needed if you get to doing a lot of sheet metal work
is an "English Wheel". There are a lot of kits for them
if you have welding skills..or, maybe you can find a good used
one around. A wheel can be thought of as a long skinny hammer.
It is a stretching device wherein the metal is squeezed between
the top wheel and different shaped interchangeable anvils below.
It is a lot quieter than a hammer, and it stretches with smooth
strokes rather than "walnut" hammer dings. Note how
the hammer dings are gone and the metal is taking on an even sheen
and shape.
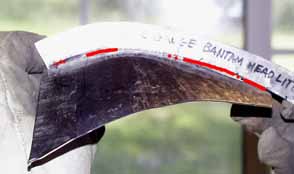 12. Here's how the contour gauge
is used. I have put red where there are low spots which have to
come up (OR is it high spots which have to come DOWN?!?!?!) It's
fun but takes most of an afternoon and you just don't feel you
are getting anywhere. Or you get close then screw it up. Hammer,
wheel, hammer wheel. I think the difference between a pro and
an amateur is here...knowing what to do when you see a condition...I
get lost several times.
12. Here's how the contour gauge
is used. I have put red where there are low spots which have to
come up (OR is it high spots which have to come DOWN?!?!?!) It's
fun but takes most of an afternoon and you just don't feel you
are getting anywhere. Or you get close then screw it up. Hammer,
wheel, hammer wheel. I think the difference between a pro and
an amateur is here...knowing what to do when you see a condition...I
get lost several times.
Later an expert Tom Lipton told me I should have had a real
"buck" so I could see UNDER the piece. I would have
seen these low spots better and pushed them up.
 12. I know the outside rim is a
circle..so I make a little pattern traced off the bucket to at
least get that part right!..Notice how the steel is getting really
smooth and beautiful in the wheel.
12. I know the outside rim is a
circle..so I make a little pattern traced off the bucket to at
least get that part right!..Notice how the steel is getting really
smooth and beautiful in the wheel.
 13. Well...I've got it about as
close as I can..and hey, after all, who's gon'na see this really?
It's the underside of the nacelle after all. But, of course that's
not the point is it..this is a "learning" experience
and I would like it to be just perfect. You know...the end is
nothing, the road is all, and all that.Well, too bad for me..it
isn't perfect. So I place this imperfect but close stealer I have
made onto the nacelle (I've cut out the welded, rusted brace)
and drill holes and insert "clecos" which hold the two
pieces of metal together very tightly and securely. I have to
give up for the day..tomorrow we'll see if we can join these two
parts together!
13. Well...I've got it about as
close as I can..and hey, after all, who's gon'na see this really?
It's the underside of the nacelle after all. But, of course that's
not the point is it..this is a "learning" experience
and I would like it to be just perfect. You know...the end is
nothing, the road is all, and all that.Well, too bad for me..it
isn't perfect. So I place this imperfect but close stealer I have
made onto the nacelle (I've cut out the welded, rusted brace)
and drill holes and insert "clecos" which hold the two
pieces of metal together very tightly and securely. I have to
give up for the day..tomorrow we'll see if we can join these two
parts together!
RESTORATION TIPS | BANTAM
HOME PAGE | SPEAR
HOME PAGE