Carpenters may measure twice and cut once...but sheet metal guys, especially inexperienced ones like me should measure 4 or 5 times ! The work that follows in thes photos is done by my friend Paul Moore, a super gearhead who can do everything. When I began to try to duplicate what I had seen him do I used a piece of heavy construction paper to make a pattern, just to be sure. Write the measurements on it and save...hey, you might get to like this work and want to do it again next year :~)
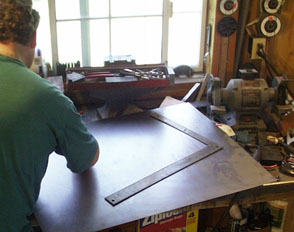
2. Paul don't need no stinking paper! He transfers his careful (and multiple) measurements right to a sheet of clean 20 gauge steel..just the same as used on the original hood.
3. Here Paul is cutting the piece out on a shear. A new entry
level 4 foot shear of Chinese manufacture that will cut 16 gauge
mild steel can be had from Erco or Grizzly for say $750-1000 .
That's about 75 cents a pound, so a good deal I guess...Maybe
you know someone who has one and 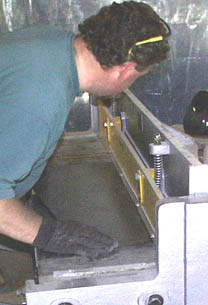 they
would cut out your pieces for you? Used, older US machines are
more expensive, but can require work to get right. Unless you
are going into production, these are okay. Maybe you and some
friends could go in on some of this sheetmetal equipment together
if you like the work?
they
would cut out your pieces for you? Used, older US machines are
more expensive, but can require work to get right. Unless you
are going into production, these are okay. Maybe you and some
friends could go in on some of this sheetmetal equipment together
if you like the work?
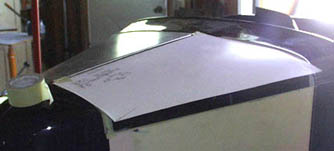
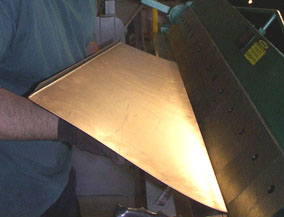
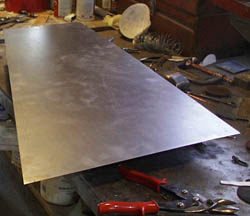 4. Here is the basic shape cut
out. Better brush up on your geometry. Remember when you took
it you kept demanding to know how you would ever use it in real
life? Well, here you go! Gosh! Look how nice and smooth and rust
free that new steel is!:~)
4. Here is the basic shape cut
out. Better brush up on your geometry. Remember when you took
it you kept demanding to know how you would ever use it in real
life? Well, here you go! Gosh! Look how nice and smooth and rust
free that new steel is!:~)
 5. Another basic tool you will
need if you get into sheetmetal work is a box finger brake. I
got this one from Grizzly for $500 and they only charged 68 dollars
to deliver it to my very rural barn door! Again it has a 4 foot
capacity and you will note the little "fingers" that
can be removed with the allen heads so you can bend part of a
piece and leave the rest flat. See how we have put in the flange
for the hinge? Hope you didn't forget to add that crucial 5/8th
to you plans or it's back to go! Here Paul is using the brake
to give a basic shape to the radius of the curve in the hood.
5. Another basic tool you will
need if you get into sheetmetal work is a box finger brake. I
got this one from Grizzly for $500 and they only charged 68 dollars
to deliver it to my very rural barn door! Again it has a 4 foot
capacity and you will note the little "fingers" that
can be removed with the allen heads so you can bend part of a
piece and leave the rest flat. See how we have put in the flange
for the hinge? Hope you didn't forget to add that crucial 5/8th
to you plans or it's back to go! Here Paul is using the brake
to give a basic shape to the radius of the curve in the hood.
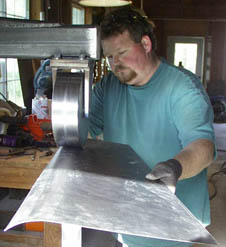
6. Another essential tool for clean metal work is an english wheel. A wheel is simply a stretching device and is just like a hammer, but different :~) Think of the metal as a big piece of really hard, stale chewing gum. As we run this between the two round wheels or anvils it squeezes and makes the gum/metal thinner in the place we have wheeled it. By stretching the metal thus and bending a bit at the same time whe can change it's shape. See the hood sides forming here?
 7. Now we can begin to fit the
piece onto the car itself which serves as a "buck".
By going back and forth from the wheel to the "buck"
to see how the fit is coming along we can get an exact fit. Since
we have stretched the metal, we need to trim off a little excess
here and there. A buck is simply a form out of wood, or steel
or what-have you that is the final shape at which you are trying
to arrive. You are constantly putting shape into the piece by
shrinking and stretching and comparing it with the buck. When
it fits you're home. If you were going to go into the business
of making Bantam fenders or something you would have to make a
buck
7. Now we can begin to fit the
piece onto the car itself which serves as a "buck".
By going back and forth from the wheel to the "buck"
to see how the fit is coming along we can get an exact fit. Since
we have stretched the metal, we need to trim off a little excess
here and there. A buck is simply a form out of wood, or steel
or what-have you that is the final shape at which you are trying
to arrive. You are constantly putting shape into the piece by
shrinking and stretching and comparing it with the buck. When
it fits you're home. If you were going to go into the business
of making Bantam fenders or something you would have to make a
buck
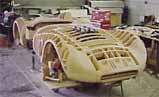
Here's an elaborate buck for a car in Metal God Ron Fourniers shop.
 8. Here the hood is fitted to the
car itself with the back of the cowl and ther top of the grille
showing us where we are with our forming. Note how there is a
gap between the piece we are making and the hood side below..this
is where the salvaged molding will go. We have cut that part off
the old hood.
8. Here the hood is fitted to the
car itself with the back of the cowl and ther top of the grille
showing us where we are with our forming. Note how there is a
gap between the piece we are making and the hood side below..this
is where the salvaged molding will go. We have cut that part off
the old hood.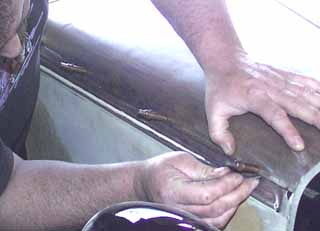 9. Clecos are little springloaded
devices you use to hold metal in place. Here the two pieces are
over lapped, holes drilled and clecos used to keep them exactly
in place. Here Paul is scribing a line on the old, lower piece.
When we cut this the idea is to make a perfect butt joint with
no overlap. When we weld it we will fuse the two together rather
than add material.
9. Clecos are little springloaded
devices you use to hold metal in place. Here the two pieces are
over lapped, holes drilled and clecos used to keep them exactly
in place. Here Paul is scribing a line on the old, lower piece.
When we cut this the idea is to make a perfect butt joint with
no overlap. When we weld it we will fuse the two together rather
than add material.
 10. Looking at the back side...when
we cut the piece we left in the four clecoes..see it sticking
through the little tab? There is a bit of fitting to do here to
get the pieces just so: perfectly butted. When they are some quick
tack welds are made with a MIG welder. These tacks now take the
place of the clecos which can be removed. The tabs are cut off
flush with the rest of the line with a very thin cut off wheel
on a grinder.
10. Looking at the back side...when
we cut the piece we left in the four clecoes..see it sticking
through the little tab? There is a bit of fitting to do here to
get the pieces just so: perfectly butted. When they are some quick
tack welds are made with a MIG welder. These tacks now take the
place of the clecos which can be removed. The tabs are cut off
flush with the rest of the line with a very thin cut off wheel
on a grinder.
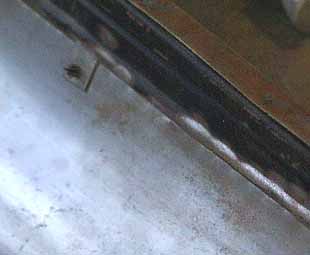
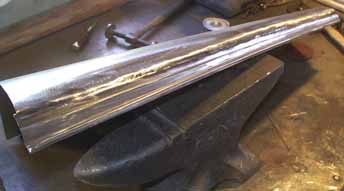 11. Well HEY! Now we're getting
somewhere! The two pieces have been carefully fused with a TIG
welder. A lot of hammer and dolly work here as you go along just
a bit at a time. The crucial thing is not to warp the piece with
all the heat. So, do a little at one end, let it cool while you
hammer it out, then go work on the other end...back and forth.
Don't let the piece buld up a lot of heat. You see a bit of protrusion
at the big end...trim it..and at the other end we had to add a
little (all predetermined because of the fit of the other nearby
pieces).
11. Well HEY! Now we're getting
somewhere! The two pieces have been carefully fused with a TIG
welder. A lot of hammer and dolly work here as you go along just
a bit at a time. The crucial thing is not to warp the piece with
all the heat. So, do a little at one end, let it cool while you
hammer it out, then go work on the other end...back and forth.
Don't let the piece buld up a lot of heat. You see a bit of protrusion
at the big end...trim it..and at the other end we had to add a
little (all predetermined because of the fit of the other nearby
pieces).
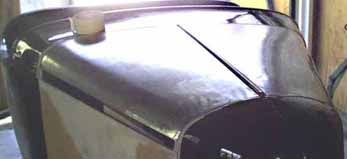
12. TA-DA! Here it is, all primered and ready to go. And what a pleasure...when you lift it up and down it's light, doesn't oil can, the underside is smooth and pit free, and best of all it fits all the surrounding pieces.
Is this ethical? Well, for one thing it's far better than anything Bantam ever put out originally, and if you are a purist you want the car warts and all. But by that measure is bondo ethical? I think the remanufactured part is, on balance, more authentic. It weighs about 3 pounds less for one thing..more like the original. The surface you are looking at is real metal like the original, not a bunch of mud.
Was it worth it? If you have a perfect set of new old stock hood piece, I guess not. This whole operation only took Paul about 4 hours to complete. The other side will take perhaps slightly less. I believe to get a real first rate surface on the old parts with bondo would have taken nearly twice as long. I'm talking here about a super straight surface that doesn't wobble and in which when painted you can see the reflection of a 48" neon tube with out a waver. But the main thing is we both hate the work with filler and we love to work with sheet metal, and hey, this is a HOBBY right?! You're supposed to be having fun. The other thing is you have to have access to the tools and skills. Shear, brake, wheel, and TIG welder. I could do just about everything here but the welding I thin..I'm just not all that good. But, if you get it that far, take it tack welded to a pro!
What you get is more or less a factory new part 60 years later. It doesn't matter what they cost because you can't buy one.
Should we try a fender next? Stay tuned...